How to create a new Flutter Project with a Boilerplate | Part 3

Clean Architecture Structure & Mobx State Management:
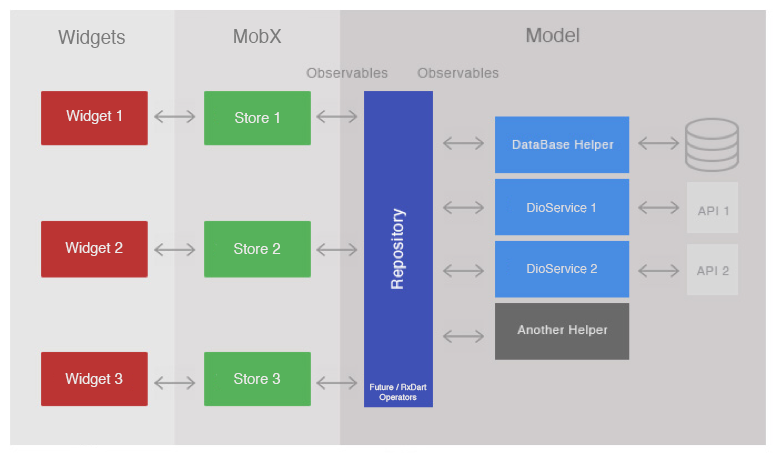
So far we know that Flutter Clean Architecture schema has 3 major layers; Data, Domain and Presentation. In this tutorial, we are going to create a real life scenario where we can use all three layers with this principal and further understand the connection between Model, Api, Repository, Mobx State Management and UI-layout part of a project.
1. Getting the Raw Data from Data Layer with Dio package;
In the example, we are going to call Raw API data from the internet and assign it to a data Model. To be able to do that, first we need to specify the endpoints. In other words we need an address to make the call from.
Head to the endpoints.dart as shown below.
|- lib/
  |- constants/
  |- data/
    |- network/
      |- constants/
        endpoints.dart
You will see the example endpoint “http://jsonplaceholder.typicode.com” to fetch fake posts to the boilerplate project. We are going to use the same address but with different call.
In this case we are going to bring fake to-dos from the address.
Inside endpoints.dart, add to-dos endpoint under posts
static const String getTodos = baseUrl + "/todos";
Before making a call to this address, we must understand what are we going to receive from this address and how we can convert this data into Dart language.
If you head to http://jsonplaceholder.typicode.com/todos, you will see the to-do class structure.
{
    "userId": 1,
    "id": 1,
    "title": "delectus aut autem",
    "completed": false
  },
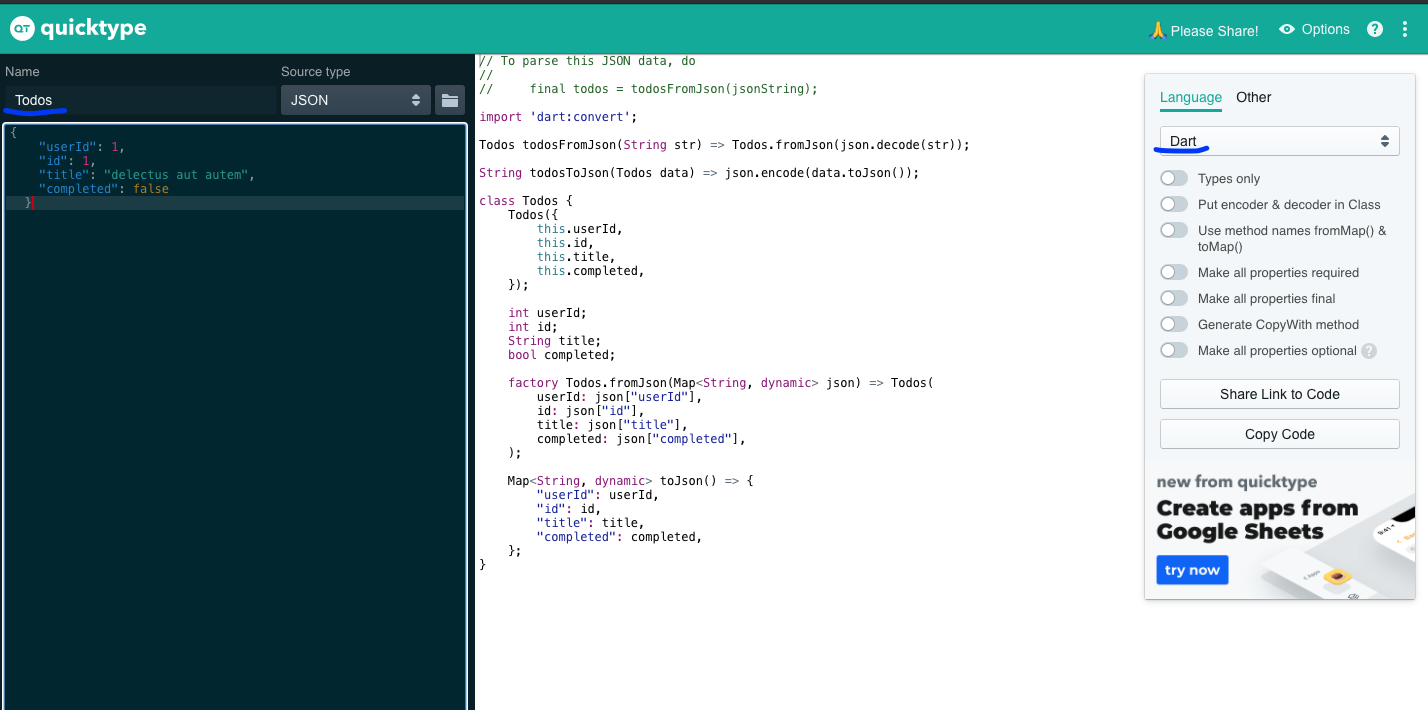
Now we know the structure in JavaScipt, so we can parse it into Dart. You can write a class in Dart manually, or you can use this website for automatic parsing.
Copy the structure above and paste it. Change the name to ‘Todos’ and choose ‘Dart’ as language.
Ok, we have the Dart Model now. Next is to put it in its right folder.
Create a new folder called todos inside models, and create a new file todos_dart inside this folder.
|- lib/
    |- constants/
    |- data/
    |- di/
    |- models/
      |- todos/
        |- todos.dart
Paste the Dart model structure inside the todos.dart… There it is, a small baby todos class is born.
That’s great. Let’s overview what we did.
- We have created a class to receive Json data and generated necessary code lines to parse it.
- We have added an endpoint(address) of the data.
Now it is time to make that call to this address and see if we can get a response.
Head to post_api.dart
|- lib/
  |- constants/
  |- data/
    |- network/
      |- apis/
        |- apis/
          post_api.dart
Note: This is where the Api request methods are being collected. You can create your own Api class if you like, but we are going to use our method inside PostApi class that is already created.
Inside PostApi let’s create a new method called getTodos.
Future<List<Todos>> getTodos() async {
    try {
      final List<dynamic>response = await _dioClient.get(Endpoints.getTodos);
      return response.map((todo) => Todos.fromJson(todo)).toList() ;
    } catch (e) {
      print(e.toString());
      throw e;
    }
  }
Breaking down the code quickly we have;
- An asynchronous function that has a type of Future List of Todos, which means the function will return a list having items of Todos class once the Future action is completed.
- A try and catch block to throw errors if there is something wrong on server or code side
- A variable named ‘response’ that has a type of List consisting of dynamic json data
- _dioClient.get() method that has an address argument. Address is Endpoints.getTodos that we previously defined.
- A return statement that maps each todos inside response variable, converts them into Dart code with fromJson method and constructs a new list with all mapped items.
With getTodos function implemented, the desired data can be successfully called from internet inside our project and converted into the dart format for later use. With that being said, the work is done on Data layer.
2. Passing the function into the Repository;
Repository is a unique layer that can be pictured as a transition layer. Its main function is to serve as a bridge between data and business logic or Domain layer. Implementation of repository is an essential part of clean architecture. It creates independency between layers that leads to easy modification, deletion and changes in different databases without affecting one another.
Repository is most useful when we collect data from User and want to pass it to multiple databases. A good example would be collecting user email from presentation layer, passing it to repository and in here writing a method that sends email data to both local database or remote database.
In this example we are going to use the repository for passing Network data into domain layer.
Head to repository.dart
|- lib/
    |- constants/
    |- data/
      repository.dart
Let’s create a new function named getTodos inside Repository class.
 Future<List<Todos>> getTodos() async {
    return await _postApi.getTodos().
      catchError((error) => throw error);
  }
This is a simple function with;
- a type of Future list of Todos
- gathers data by calling getTodos function from API class
- throws error when encountered any.
Note: If you want to pass data to both databases, you can see the example function to getPosts inside Repository class.
Now we passed the data from network layer to repository layer, next step is to create use cases for modifying the data.
3. Creating a use case with Mobx State Management:
When reading the documentation you will see the definition of Mobx as a simple way to connect the reactive data of your application with the UI. Well, it is not that simple in the beginning. However, great news is that we already have the reactive network data we fetched up until repository so that we can connect it with UI right after understanding some key concepts about Mobx.
How exactly are we supposed to use Mobx?
By default, Mobx state management uses a concept called stores. These stores hold the key variables that changes the state of the app or types of functions that change these variables. Every variable or function has to be created inside these stores. In addition, these stores can be accessed by providing them into the UI layer with Provider state management tool.
It may sound a bit complicated in the beginning so for now imagine a virtual vault with all the functionality & data you need and when you want to use them, instead of bringing the whole vault, you can open a portal that goes to the vault anytime, anywhere.
There are 3 main concepts in Mobx
- Observables
- Actions
- Reactions
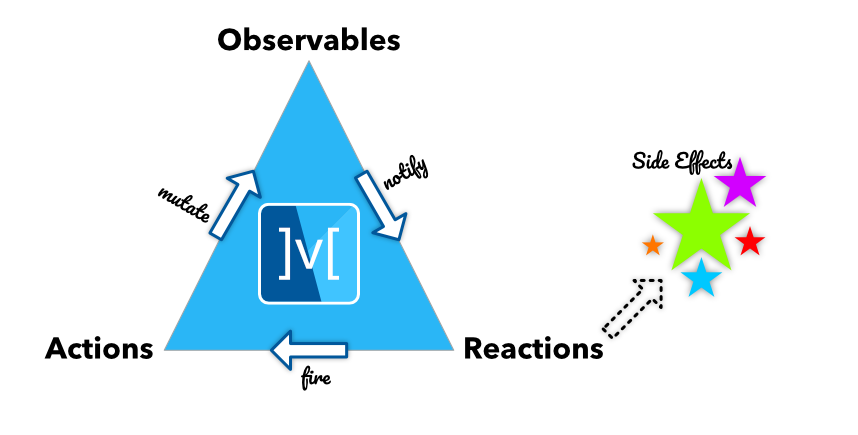
Observables are properties, entire objects, arrays, Maps and Sets. In short every field that holds information that can change the state.
Actions are methods that change, modify or delete these observables. For now let’s say all the functions are called actions.
Reactions are a way of creating side effects based on the changes in observables.
To picture this vividly, let’s imagine a water cup as an observable. An action is to pour water into the cup that changes its state. A reaction can be spilling of water when there is more water than the cup can hold.
Last but not least, we should also note there is one more concept that is called Computed. It is not a reaction, nor action, but it is an automatic process to derive new information from observables.
In water cup example, if we want to know what is the weight of the water cup, we can use a computed. It is not an action because it does not modify the cup, it is not a reaction because the weight of the cup is not an effect, but a value only based on the observable.
There has been a lot to take in. Before we give up and close the page, let’s refresh ourselves a bit…

Now that we know the basics let’s jump straight into real life usage of Mobx state management.
1. Creating a store.
Create a new folder called todos inside Lib → Stores. Then create a file called todos_store.dart.
Next, paste this boilerplate code directly inside the file.
import 'package:mobx/mobx.dart';
part 'todos_store.g.dart';

class TodosStore = _TodosStoreBase with _$TodosStore;

abstract class _TodosStoreBase with Store {

}
Final step is to run build_runner. If you do not have any idea what code generation is, there is a detailed description in the first part of the series.
Open up the terminal and paste the lines below and watch the code generating itself.
flutter packages pub run build_runner watch --delete-conflicting-outputs
The key to work with MobX state management is to keep the build_runner working on the backside so that it can generate the code on the go. For this reason, instead of using “build_runner build”, we are using “build_runner watch” this time.
Once you see all the problems disappear, we can head to the next step.
2. Connecting the Store with the Project.
This is another necessary step that we have to go through to make sure the application knows where the store is so that the provider can bring the store to places where needed.
Head to lib → main.dart
Create a TodosStore object with the code below inside MyApp widget under the other store objects.
final TodosStore _todosStore = TodosStore(appComponent.getRepository());
Next add this object into list of providers inside MultiProvider widget which is inside the Build method.
Provider<TodosStore>(create: (_) => _todosStore),
3. Adding Store Elements.
The preferred way of creating a store objects is to first create the observables.
Since we are going to fetch multiple todos, it is most logical to create a list as an observable. Let’s create an empty observable list.
@observable
  ObservableList<Todos> todosList = ObservableList.of([]);
Observable lists are almost identical with normal lists, however they are essential in mobx because of their responsive behavior towards change of state. This means, whenever there is a change in the list the state will be updated automatically.
Next, we can create an action that adds fetched todo lists from the server inside this list.
First let’s inject or bring the repository inside our store because this is where our function waits to be called to get the todos data.
Your code should look like this once you bring the repository inside the store.
class TodosStore = _TodosStoreBase with _$TodosStore;

abstract class _TodosStoreBase with Store {
  Repository _repository;

  _TodosStoreBase(Repository repository) {
    this._repository = repository;
  }
  @observable
  ObservableList<Todos> todosList = ObservableList.of([]);
}
Now let’s create an action which is basically the method to fetch todos.
@action
  Future fetchTodos() async {
    _repository.getTodos().then((todos) {
      todosList.addAll(todos);
    }).catchError((e) {
      if (e is DioError) {
        print(e);
      }
    });
  }
The method is a Future type that first calls the getTodos function inside repository, then it takes these todos from internet and adds all of them inside the observable list called “todosList”. And, finally it checks if there is an error with the method and prints the error if there is any.
4. Creating a todos list UI.
As the last step of the tutorial let’s head back to the base.dart and make a todos list.
First let’s call the todos store inside the base.dart. Create a TodosStore object.
TodosStore _todosStore;
Then call this object inside didChangeDependencies lifecycle method.
@override
void didChangeDependencies() {
  super.didChangeDependencies();
  _todosStore = Provider.of<TodosStore>(context);
}
Next, let’s change the layout a bit and move the theme Icon from body to AppBar.
 AppBar(
        title: Text('Base Screen'),
        actions: [
          IconButton(
            onPressed: () {
              _themeStore.changeBrightnessToDark(!_themeStore.darkMode);
            },
            icon: Icon(
              _themeStore.darkMode ? Icons.brightness_5 : Icons.brightness_3,
              color: Theme.of(context).accentColor,
            ),
          ),
        ],
      ),
And, create a Scaffold body with ListView.separated
 Padding(
          padding: const EdgeInsets.all(10.0),
          child: ListView.separated(
            itemCount: _todosStore.todosList.length,
            separatorBuilder: (context, position) {
              return Divider();
            },
            itemBuilder: (context, position) {
              return Column(
                crossAxisAlignment: CrossAxisAlignment.start,
                children: [
                  Text(_todosStore.todosList[position].title),
                  Icon(_todosStore.todosList[position].completed
                      ? Icons.check_circle
                      : Icons.check_circle_outline)
                ],
              );
            },
          ),
        );
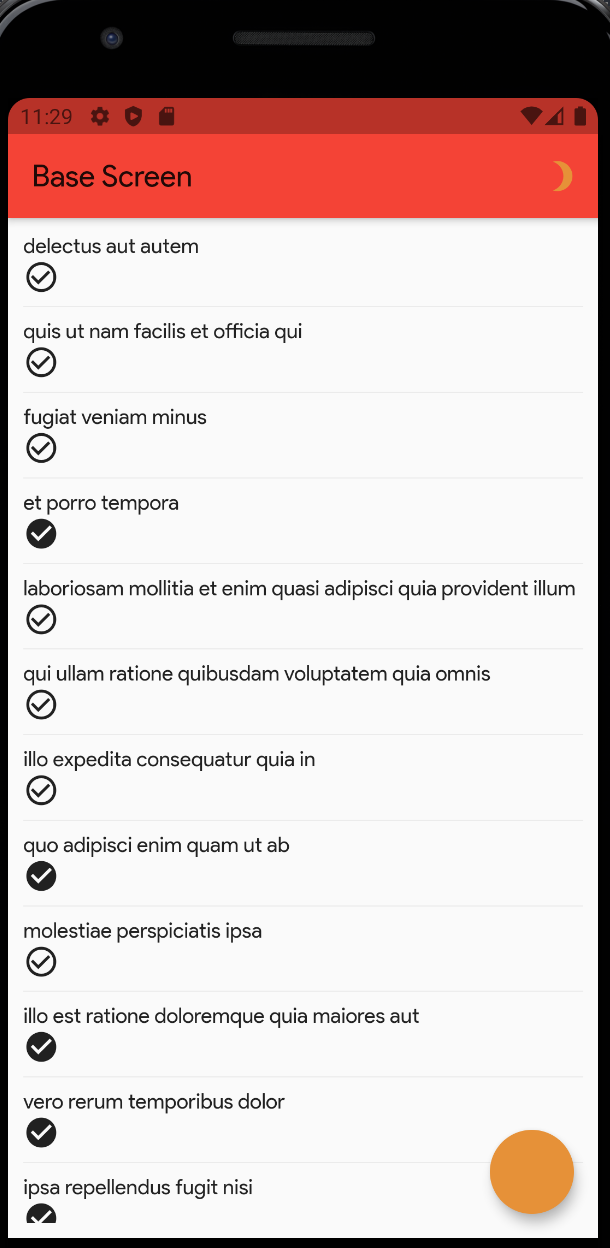
Each tile is separated with a Divider and each tile is a Column that has 2 children.
First child is a text that shows the title of the todo with the specific position.
Second child is an Icon with a ternary operator that visualizes whether a todo is completed or not.
Ok, the ListView is set now let’s fetch the todos.
Create a FloatingActionButton that fetches todos on onPress.
FloatingActionButton(onPressed: () {
        _todosStore.fetchTodos();
      }),
Seems like we can smash that button to get the todos now.
Oh…it kinda works but where are all the todos?

Well it is because still we need to implement one of the most essential part of the Mobx.
Enter Observer…
Observer is a Mobx reaction that watches an observable in UI part of the project and makes the necessary state updating automatically as soon as there is a change in the observer.
It is basically you in the example of water cup that watches the changes in the water cup and notifies your brain to update the state of the water cup.
Alright, let’s put observer in action.
It is very simple. Just wrap the widget with an observer that you want it to be observed.
Click on the widget name, in this case Padding that holds the ListView, and click on the light bulb.
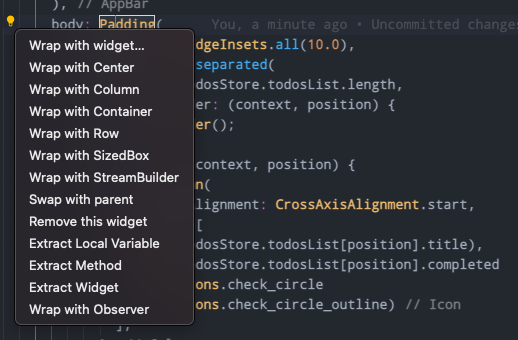
At down below we have an option that is Wrap with Observer. Click on it and let the Observer wrap the Padding widget automatically.
Your code should look like this now.
Observer(builder: (_) {
        return Padding(
          padding: const EdgeInsets.all(10.0),
          child: ListView.separated(
            itemCount: _todosStore.todosList.length,
            separatorBuilder: (context, position) {
              return Divider();
            },
            itemBuilder: (context, position) {
              return Column(
                crossAxisAlignment: CrossAxisAlignment.start,
                children: [
                  Text(_todosStore.todosList[position].title),
                  Icon(_todosStore.todosList[position].completed
                      ? Icons.check_circle
                      : Icons.check_circle_outline)
                ],
              );
            },
          ),
        );
      }),
Now, the final moment that we all being waiting for…but let’s first hit hot restart. Keep in mind that it is recommended to hit hot restart each time we made changes with Mobx objects such as observables.
Ok, press the fetch button…and voilà!
This concludes the end of the series, though there are still tons of features to be covered within this boilerplate template such as dependency injection and local database, but they are huge topics by their own. However, I intend to make their own in-depth tutorials in the future.

Now go out there and start making amazing projects of your own!
Here is the github repository to see the full code.
This boilerplate template is made by Zubairehman. All credit goes to him for preparing an exceptional starting point for a business level Flutter projects.