MobX: Flutter State Management like a Boss
In this tutorial, we are going to learn how to control the state of the UI with the MobX state management method.
If you are someone who is interested in Flutter, by now you should have heard about the State Management phrase a couple of times. In fact, as a Flutter developer, this term becomes part of your daily life.
Even though it seems difficult in the beginning and the term itself gained a reputation for being complicated, it will get easier to get a grasp on it once you understand what is the State, and why do we have to manage it?
What is the State?
To understand the term State, we must first understand how Flutter builds the User Interface.
Flutter is a declarative framework. This means that every time there is a change on your screen, the framework itself re-draws the screen to show the changes. Video games are declarative as well and this is one of the main reasons you need a good graphics card to process and re-draw all the momentary changes in the UI.
In a declarative framework the code is stable. But something has to change for UI to be re-built, and that is the ‘Data’. In addition, this data change itself is called the ‘State’ of the app.
In other words, if the color of a container widget changes when you press a button, the widget itself stays stable whereas the data changes with the given color value when the button is pressed.
There are two types of state;
- Ephemeral state(sometimes called UI state or local state) ⇒ is the state you can neatly contain in a single widget.
- App state⇒ is the state that you want to share across many parts of your app.
The ephemeral state is being handled by good old StatefulWidget. For further information about StatelessWidget and StatefulWidget, you can head over to the original documentation.
In our case, the App state such as theme change or authentication status is where Flutter requires a State Management solution. There is no magical StatefulApp widget or something similar, for this reason, we need a solution. And this is where MobX enters the scene…
I know it is a lot to take in. As much as it sounds boring by now, it is also very crucial to learn this information to be natural with state management.

Meet the MobX
In the official documentation, the definition of Mobx is a simple way to connect the reactive data of your application with the UI. As simple as it may sound simple, there are a couple of key concepts and terms one should know to understand how MobX works behind the curtains.
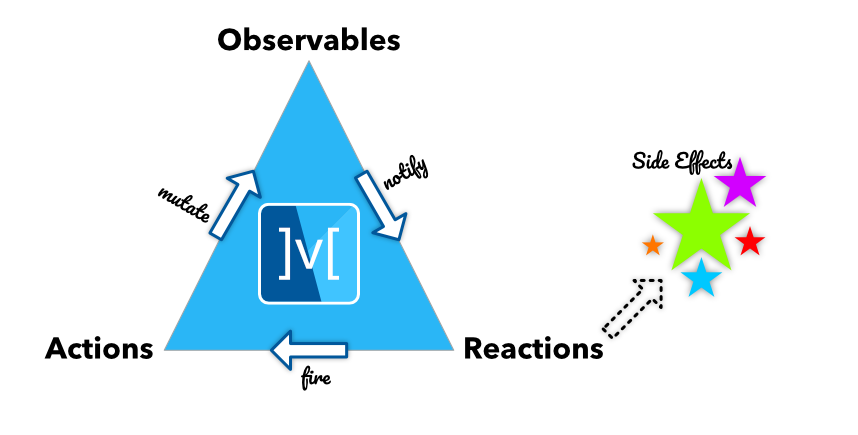
There are 3 main concepts in Mobx
- Observables
- Actions
- Reactions
-
Observables are properties, entire objects, arrays, Maps, and Sets. In short every field that holds information that can change the state.
-
Actions are methods that change, modify or delete these observables. For now, let’s say all the functions are called actions.
-
Reactions are a way of creating side effects based on the changes in observables.
To picture this vividly, let’s imagine an observable that is a water cup. Action is to pour water into the cup that changes its state. A reaction would be water spilling when there is more water than the cup can hold.
- Last but not least, we should also note there is one more concept called Computed. It is not a reaction, nor action, but it is an automatic process to derive new information from observables.
In the water cup example, if we want to know what is the weight of the water cup, we can use a computed. It is not an action because it does not modify the cup, it is not a reaction because the weight of the cup is not an effect, but a value only based on the observable.
There has been a lot to take in. Before we give up and close the page, let’s refresh ourselves a bit…

By default, Mobx state management uses a concept called stores. These stores hold the observables, actions, reactions, and computed. In addition, these stores can be accessed by providing them into the UI layer with Provider state management tool.
For now, it is enough to know that stores are like the business logic vaults that hold necessary information to modify the state of the UI.
Well, enough information… Let’s jump straight into the real-life usage of Mobx state management.
1. Creating a store.
First, let’s install the necessary packages and extensions.
Inside pubspec.yaml file, add these dependencies.
dependencies:
  flutter_mobx: ^2.0.0
  mobx: ^2.0.1
  provider: ^5.0.0

dev_dependencies:
  build_runner: ^1.12.2
  mobx_codegen: ^2.0.1+3
Note: The version of these packages might change, so please get the latest version from the pub.dev.
Next, install flutter_mobx extension.

In this example, we are going to use MobX to modify the state of the famous Counter app that we are all familiar with.
In order to do that, first, we will create a folder to hold the Store.
Create a folder named counter_store inside Lib. Then create a file called counter_store.dart.
Next, paste this boilerplate code directly inside the file.
import 'package:mobx/mobx.dart';
part 'counter_store.g.dart';

class CounterStore = _CounterStoreBase with _$CounterStore;

abstract class _CounterStoreBase with Store {

}
As you can see, there is a compile error because there is a missing file. The file has to be generated.
Important note: MobX works with generated code. Any installation or change inside the stores needs code generation. To generate the code is to run build_runner.
Open up the terminal and paste the lines below.
flutter packages pub run build_runner watch --delete-conflicting-outputs
The key to work with MobX state management is to keep the build_runner working on the backside so that it can generate the code on the go. For this reason, instead of using “build_runner build”, we are using “build_runner watch”.
Once you see all the problems disappear, we can head to the next step.
2. Injecting the Store
This is another necessary process. It is to inject the store into the widget tree. In order to do that we are going to use the Provider package/
Head to lib → main.dart
Inside MyApp widget, create a CounterStore object with the code below.
final CounterStore _counterStore = CounterStore();
Next, wrap the MaterialApp with a provider and inject the CounterStore.
class MyApp extends StatelessWidget {
  CounterStore _counterStore = CounterStore();
  @override
  Widget build(BuildContext context) {
    return MultiProvider(
    providers: [
    Provider<CounterStore>(create: (_) => _counterStore),
    ],
          child: MaterialApp(
        title: 'Flutter Mobx Tutorial',
        theme: ThemeData(
          primarySwatch: Colors.blue,
        ),
        home: MyHomePage(title: 'Flutter Mobx Tutorial'),
      ),
    );
  }
}
3. Adding Store Elements.
The preferred way of creating store objects is to first create the observables.
Let’s create counter variable.
@observable
  int counter = 0;
Now, we can create an action to increment the value of the counter.
 @action
  void incrementCounter() {
    counter++;
  }
4. UI Layer & Observer
Until now, we created a store, injected it into the widget tree, added the observables and actions. So now it is time to use them in the UI layer.
In order to use the store inside the MyHomePage widget, we need to call the instance of the store. In the _MyHomePageState let’s create the instance.
CounterStore _counterStore;
  @override
  void didChangeDependencies() {
    super.didChangeDependencies();
    _counterStore = Provider.of<CounterStore>(context);
  }
Now we can use the _counterStore to call the observables and actions from the store.
Change the _counter to _counterStore.counter
  Text(
   '${_counterStore.counter}',
   style: Theme.of(context).textTheme.headline4,
  ),
and onPressed function,
onPressed: _counterStore.incrementCounter,
That’s it. Seems like we can smash the button to increment the counter now.
Oh…it kinda works, but why can’t we see the numbers incremented?

Well, it is because we still need to implement one of the most essential parts of the Mobx.
Enter Observer…
The observer is a Mobx reaction that watches an observable in UI, and makes the necessary state updating automatically as soon as there is a change on observable.
The observer is basically your eyes in the example of a water cup that watches the changes in the water cup and notifies your brain to update the state of the water cup that you observe.
Alright, let’s put the observer in action.
It is very simple. Just wrap the widget with an observer that you want it to be observed.
Click on the widget name, in this case, Scaffold, and click on the light bulb and choose Wrap with Observer.
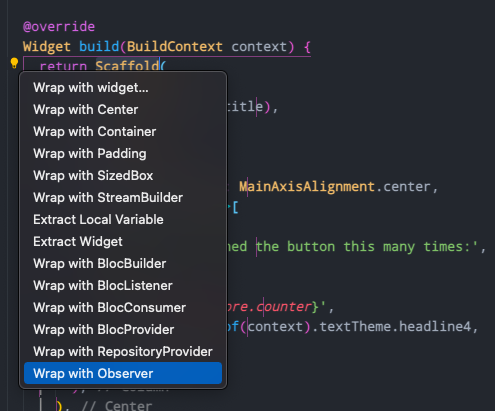
Your code should look like this now.
 @override
  Widget build(BuildContext context) {
    return Observer(builder: (_) {
      return Scaffold(
        appBar: AppBar(
          title: Text(widget.title),
        ),
        body: Center(
          child: Column(
            mainAxisAlignment: MainAxisAlignment.center,
            children: <Widget>[
              Text(
                'You have pushed the button this many times:',
              ),
              Text(
                '${_counterStore.counter}',
                style: Theme.of(context).textTheme.headline4,
              ),
            ],
          ),
        ),
        floatingActionButton: FloatingActionButton(
          onPressed: _counterStore.incrementCounter,
          tooltip: 'Increment',
          child: Icon(Icons.add),
        ),
      );
    });
  }
Now, the final moment that we all been waiting for…but let’s first hit hot restart.
Ok, press the increment button…and voilà!
What’s next?
This concludes the tutorial for now. Please note that what we learned is just scratching the surface of what MobX can do. In the upcoming articles, I intend to grasp advanced concepts such as reactions, computed, and ObservableLists, however with this knowledge you can pretty much modify the state of simple applications.
For more examples and guides you can see the original documentation.

Now go out there and start making amazing projects of your own!
Here is the github repository to see the full code.
Plus, you can find me on Twitter and say hi!